View Transcript
HOUSE DOCTOR Transcript
HD031 “SNAP-TOGETHER STORAGE SHED” from episode 303-F
RON:
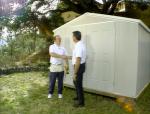
Here's Greg Warner with Royal Rubbermaid with a step-by-step demonstration on how to build a brand new storage shed that literally snaps together.
GREG:
The first step is to pick out a site in your yard. What you want to look for is a relatively level area with about 5 feet of clearance on all sides and 14 feet of clearance above you.
Then you'll have to decide on the type of foundation that you'll be using for your building. Depending on your local building codes, you may choose to go with concrete or a wooden foundation. In this case, we'll be using pressure-treated 2x4s and three-quarter inch exterior grade plywood.
Once you've completed the foundation, the next step is to install the aluminum channel, which will define the perimeter of your building. Double-check all your measurements, make sure that the corners are square, and then set your door opening to 70 and 3/4 of an inch.
We're now ready to build the walls. The panels come in groups of three, and we're going to insert them into the foundation channel, and then we'll lock them in place with a specially designed corner post, which will ensure that the building is square.
Next, we install the aluminum lintel over the door. The header snaps in place over the top, which then completes the perimeter of our building.
The roof assembly consists of several components. The first is the slope wall cap. It's in two pieces per side, and it snaps into position.
The ridge beam consists of two parts with a metal connector that joins the two halves together. Once that's done, it sits on top of the roof, and the panels slide into it.
All that's left is to install the doors. They're steel raised-panel with a foam core. They're already pre-hung. All you have to do is drop the pins into position.
And the final step is putting the locking door handles in position. Now our building is complete. Thank you, Scott.
SCOTT:
Thanks, Greg.
GREG:
One of the many advantages of this building is that it takes two people approximately three hours to assemble it. Another nice feature is that if you should ever move and you want to take it down, you can disassemble the building in approximately 30 minutes.
Need more room for tools, bikes, or the lawn mower? A snap-together storage shed may be the easiest way! In this episode of House Doctor, Greg Warner with Royal Rubbermaid gives a step-by-step demonstration on how to build a brand new storage shed that literally snaps together.
Overview of Key Steps:
Step 1: Pick Your Site
The first step is starting with the right spot. Look for a fairly level spot with about 5 feet of clearance on all sides and 14 feet of clearance overhead.
Step 2: Build the Foundation
Lay the Groundwork by checking your local building codes before you do anything else, because they'll tell you whether you need a concrete or wooden foundation. For this build, Greg uses pressure-treated 2x4s with three-quarter inch exterior grade plywood on top.
Step 3: Install the Aluminum Channel and Raise the Walls
The aluminum channel defines the perimeter of your shed. The wall panels come in groups of three. Insert them into the foundation channel, then lock them in place with the specially designed corner posts, which keep the building square.
Step 4: Add the Lintel and Header
Install the aluminum lintel over the door opening, then snap the header into place over the top. That completes the perimeter of your shed.
Step 5: Assemble the Roof
The roof goes together in a few simple pieces. First, snap the two-piece slope wall caps into position on each side. Next, join the two halves of the ridge beam with the metal connector and set it on top of the roof. The roof panels then slide right into it.
Step 6: Hang the Doors
The steel raised-panel doors have a foam core and arrive pre-hung. Just drop the pins into position.
Step 7: Add the Locking Handles
Put the locking door handles in place, and your shed is done.
Building a snap-together storage shed provides an easy, quick way to expand your outdoor storage space. For more project ideas and tutorials, visit housecallsdiy.com today!